Friday, 17 August 2012

Always learning

Beware this is a picture heavy post!!

So I have been pretty busy on the taxidermy front once again! I currently (still) have no internet but before my phone internet decided to fizzle out, I spent hours a day on the taxidermy.net forums. In particular a certain thread 'Lifesize mammals only'. I learned a LOT about the wrapping of specimens from their carcasses. I applied this knowledge to my taxidermy and am already seeing results!

A Least Weasel and a Domestic rat, both wrapped, and both sleeping.
The weasel was originally going to just be standing but I noticed an unfortunate furslip on the underside of him after I had mounted him. So now I have a new plan, I'll post it here in a few weeks when the weasel mount is completed :) The weasel is mounted on a woodwool and wire form, using a casted head and the original leg bones.

Two mice for an art installation.
Once again I have been working on mice for a client, for her art installation. These are mounted on clay forms while it is still wet, and then sculpted from the outside.

Close up of the WIP weasel.
I am a lot happier with the shape of the weasel's head than my previous one (which was a soft mount). All my moulding and casting materials arrived, so I have been using them to make heads. They are so worth it! I will be doing a step by step on how to cast heads in the future! The weasel still needs painting up and such, but overall I am very happy.


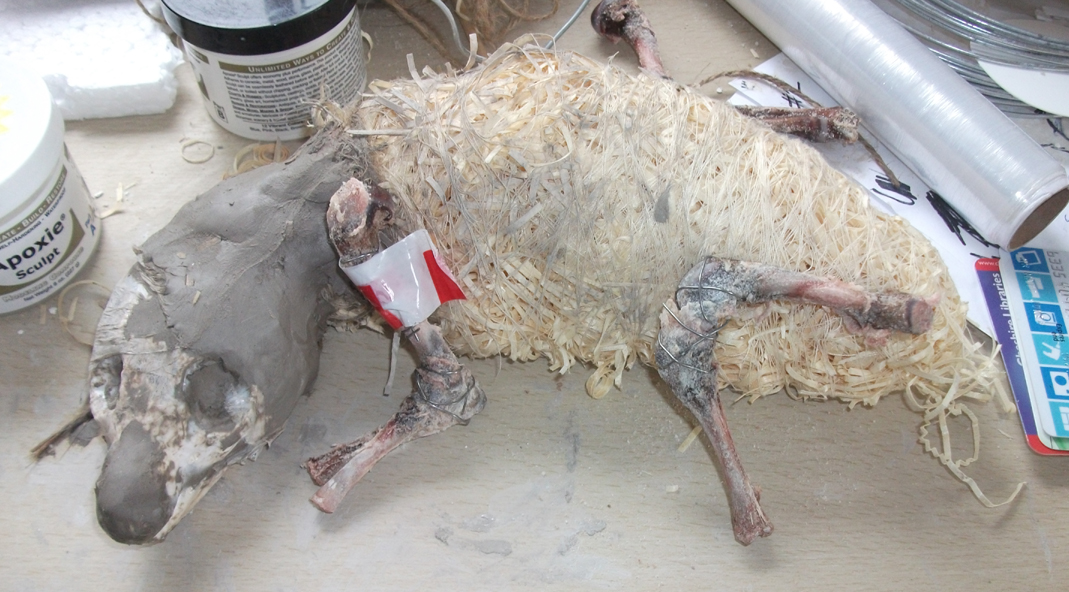
Mannikin for a fox cub, WIP

I am also in the process of making a mannikin for a fox cub, as seen above. The skin is soaking in denatured alcohol for about a week, this sets the hair.This is being made with woodwool. The head is cast in plaster and the original leg bones are going to be used. I am still fiddling around with the pose I want her in. Today I found this photo on Google.com:


I think something like this would be a cute pose for her! This cub is about the same size as my cub also. At the moment the mannikin is a bit all over the place as you can see from the mess below:

WIP mannikin: legs need to be wrapped, along with the tail.
I will take photos of my progress, this is my first fox mount, so I really hope that it will go well! I have another young cub (even younger, poor thing) in the freezer so I will probably mount that one in a sleeping pose also.

Empty coffee mug, need more coffee!!!
Lastly, I wanted to mention this amazing book by Mike Gadd, one of the UK's leading taxidermists that I purchased recently. I was a bit put off at the price, but it is very VERY worth it. It has anything you could even want to know about mounting a small mammal on a wrapped form. It goes into the anatomical details, troubleshooting, materials needed, importance of reference etc etc etc and there are photos for every single step of the way! PLUS it is nice to have a book aimed at the UK taxidermists, and not US. So the materials he mentions are obtainable! :)

Expensive but well worth saving up for! And besides, it is a lot cheaper than his courses.

That's it for now! I will update again soon, and as always, if you have any questions for me, you can email me at: foxtrailtaxidermy@hotmail.co.uk

Thursday, 9 August 2012

Of Water Deer and Skulls

I have been pretty busy lately on the taxidermy front!

A few weeks ago I skinned a Chinese water deer head for a trophy mount. This was sent to me in the post by another taxidermist who I am in regular contact with. These deer are not a native species to the UK, introduced in 1870 to zoos. Eventually some were released and others escaped. They are very odd looking deer, they have the nickname the 'vampire deer'! And you can see why!

Male Chinese Water Deer have tusks instead of antlers!
The Chinese Water Deer (CWD) I had was a doe, so her 'fangs' were a lot smaller and didn't even protrude over her lower lip. Apart from that, she looked identical to the male. Gorgeous deer, but from the front they actually look rather dog-like.

So a few weeks ago I skinned the head and fleshed the hide. This all took a few hours. I then stuck the cape back in the freezer. Normally I salt everything but I didn't want to do this, as her hair was brittle and I didn't want to lose any. Of course I made some holes in the skinning and fleshing process, but nothing I can't repair.


The CWD deer cape after skinning.

After the cape had been soaked and degreased the following day, I put her in the tan as normal.

The next day the tan had turned brown! I washed the CWD again and put her back in the freezer for now as I had to throw away the tan. As I can't afford a new kit of white tan again at the moment I made an alum/salt/sodium bicarbonate broth and stuck the smaller skins (guinea pigs and rabbits) in that. Gonna see if that works now! I haven't tanned with alum before but I am pretty sure that the white tan Snowdonia Supplies sells IS the alum tan.

Yesterday I also received a muntjac doe and three squirrels in the mail. I also have a form and eyes for the doe, as I got them free with the specimens from the seller. She was getting rid of her taxidermy stuff so I purchased it all cheap. I was very happy with that!

Apart from the deer, I have been working on some 'soft mounts'. This is where the head is mounted in a tanned skin, and the remainder is filled with foam, stuffing or something that makes the body 'floppy'. Although I am not sure how I feel on this type of taxidermy, I do take them as commissions :) I make sure that the buyer understands that this is the skin of a dead animal and not a toy or plushie.

The two heads I have mounted lately are for another taxidermist who wants to finish them off. They are a stoat and a mink.

Stoat head only mounted.
I am quite happy with the stoats' head, and I feel it is definately an improvement from the last few. I still have a long way to go though and I need to practice more with lips and eyes, in particular.

Mink head only mounted.
The mink was more difficult as it was larger. It is my first mink though, so I will take photos when it's finished, and hopefully it will turn out better when I've done the finishing work.

ALSO (yes I have been busy!), I have been cleaning skulls!

CWD, Rabbit and Guinea Pig skulls
The above skulls were all cleaned using the simmering method. I will post a tutorial on that in the upcoming weeks! The skulls are also for sale! Please email me at foxtrailtaxidermy@hotmail.co.uk if interested!

Also I ordered some alginate, plaster of paris and some sillicone and I am going to have a go at making deathmasks and head forms! I am hoping that this will improve my taxidermy a lot, and I will post photos of them for other people's reference as well.

So that's what I have been up to!

Thursday, 26 July 2012

Taxidermy Suppliers in the UK

Even though the taxidermy industry in the UK might seem dwarfed by it's American counterpart, we are thankfully not at a loss when it comes to suppliers. There are four suppliers that I am currently aware of, and use regularly. This blog post will deal with them, including my own personal experiences.

JHT Supplies, South Wales - http://stores.ebay.co.uk/jhttaxidermysupplies

Search for any taxidermy supply on Ebay and you will inevitably find JHT supplies within seconds. They are the largest taxidermy supplier in the UK, as it seems. They stock a large variety of forms, eyes, chemicals, tools and bases for the amateur and expert taxidermist. Also available through them is a yearly subscription to the US' premier taxidermy magazine Breakthrough, as well as individual issues. I have used JHT for 3-4 years now, and they never fail to impress.

They do have a paper based catalogue which is full of wonderful things for the taxidermist. It also provides information on measuring your specimen for a form, and also explanations of, and examples of mounts made with the various products. All their products are high quality and their customer service is excellent. I cannot recommend them higher.

They do not have a website, but they do run an ebay store. You can also email them at johnharletttaxidermy@hotmail.com with orders, catalogue requests (which is free) and for general advice on the products that you need to make your mount look the part.

Snowdonia Taxidermy Supplies, Wales - http://www.snowdoniasupplies.co.uk/

Snowdonia Taxidermy Supplies previously stocked a lot more items, including forms. However, JHT have surpassed them in sales in this area through the ebay selling platform. Now, they stock only chemicals and tools for taxidermy and sculpture. Their glass eye products are now over at another website, which is mentioned below.

Despite this, they do have some products worth purchasing. Their chemicals are very good, and I purchase my 'white tan' from them. JHT stock Lutan-F, but I haven't tried that out yet. For now, STS white tan is good for me as it's great value for money, and very efficient. Their 'supa-soft oil' is also excellent for pelts. They also stock instructional DVDs, skull bleach, needles and knives and other useful tools.

All chemicals come with FULL instruction sheets and F.A.Q.s.

I have also had a good experience with STS and I would recommend them to everyone for their low cost, high quality chemicals and tools.

Glasseyes.com - http://www.glasseyes.com/

Sister site and side-business of STS, glasseyes.com have a massive (and I mean massive!) selection of glass eyes for taxidermy, doll making and other similar products. Expect the same service and quality as STS, and they can help you out with any enquires you have if you email them.

Watkins & Doncaster - http://www.watdon.co.uk/the-naturalists/

Primarily a store for naturalists, but they do stock some taxidermy items. Their prices are a little higher than STS and JHT, but they do sell a fox rug head that the other two do not, as well as many quirky and interesting things. Also they have earliners that are not lead, like JHT.

Worth a look, even if just to order their catalogue.


Well, I hope that helps some of you budding taxidermists in the UK! Feel free to email me at foxtrailtaxidermy@hotmail.co.uk with anything, any time!

Saturday, 21 July 2012

Tanning with White Tan

Recently I have set up a little tanning system in my apartment, and have been processing some skins. In looking through my freezer, I found 5 stoat skins and 3 guinea pigs to work with.

European stoat pelt, tanned and taxidermy-ready
The stoat pelts were already ready for tanning as they were purchased from a lady in Scotland already skinned. I skipped the salting step as they had been soaked in methylated spirits prior to freezing. They turned out pretty nice, though I had to degrease them a fair few times!

The guinea pigs were processed from raw frozen and so I will explain how I process my skins here:

- Firstly the animal is defrosted, I usually spray them with 'stop slip', or soak them in methylated spirits.

- The animal is then skinned. The way in which it is skinned depends on the way it is to be mounted. Usually I skin my specimens with a 'ventral incision', this is a cut that goes from the genital area, or just above, to the mid chest or under the chin.

  
Winter version of the above


- After skinning, the animal is fleshed. This is the process of removing all fat, meat and membrane from the skin. This is to ensure that the salt and the tan penetrates the skin layers. Tanning solution will not work properly through fat tissue. In the fleshing process, the lips and ears are split and the nose cartilage and eyes are thinned.

- Next the pelt is salted. This is the process of rubbing salt into the skin to ensure that all fat molecules and moisture are pulled out of the skin. The tanning solution will replace that 'space' in the skin layers. The pelt is rubbed all over on the skin side with salt, and then placed on a tilted mesh to drain. 24 hours later, the wet salt is shaken off and the pelt is re-salted and then hung or placed to dry.

- 24-48 hours after this, the pelt is degreased. To do this, I soak it in a bucket of fairy washing up liquid and cold water for half an hour. This helps to draw out the grease in the skin. I then rinse the skin in the sink and make sure all suds are washed out.

Domestic guinea pig pelt
- Next is the tanning step. I use Snowdonia Supplies white tan for small animals up to a fox, and also capes. I have a large bucket which has my tanning solution in it. The same tan keeps for a while, so this is very convenient to me. I put the skin in the tan and make sure to stir it once or twice a day.

- I leave the pelt in for a week (though they take less than this, I leave them in longer to ensure that all parts of the pelt are penetrated with the tan). After this, I remove the skin, degrease it again, rinse it and hang it to dry. If the skin is to be mounted straight away, I freeze it in a plastic bag at this point.

- Once the skin is dried hard, I apply warm Snowdonia Supplies supa-soft oil to the pelt, allow it to soak in overnight, and then stretch the skin the next day. If the pelt needs degreasing again, I then do that.

- Then the skin is left to dry, stretching it several times a day until dry and soft.

A red fox vixen pelt that I currently have in my tanning bucket. 
And that is how I process my small animal skins!

I would also like to add that all guinea pigs were purchased frozen from http://www.frozenreptile.co.uk and were not killed for the purpose of taxidermy.

Sunday, 8 July 2012

Update

Hey everyone! Sorry it's been so long since I've updated my blog. I moved to an apartment and have been unable to get online a lot of the time. Taxidermy will be resuming very soon. I have some pelts in the tan as we speak, stoats and guinea pigs. I'll upload photos if they come out okay :)

Anyways expect new updates from me soon!

Friday, 23 March 2012

Today I finally took some photos of the first soft mount stoat commission I did:


This one gave me a lot of trouble around the face, especially the lips. The head also had a bald spot that I had to fix with a hair transplant :0

All in all I am quite happy with it :)

He is tanned and 'stuffed' with a clay and foam head, taxidermy glass eyes, teddy bear stuffing in the neck and legs and 'beans' for the body. He is slightly pose-able (I would say 'manipulable').

Also, here is the WIP head for the second commissioned stoat! I feel it's an improvement :D


No, the pins are not for some weird voodoo ritual. They keep the skin in place and such while the clay and skin dry :)

I also tried to mount some mice and moles, but the furslip on all of them was too bad but ONE mouse. He has a little behind his ear but hopefully it will look fine once dry. I have another 5 mice in the freezer so it's not the end of the world, but still :(

Monday, 19 March 2012

Sorry for the lack of updates! I have been busy, but not so much with taxidermy, just personal life things.

Anyways, today I skinned two stoats! One was fine but the other was pretty badly freezer burnt, so I just kept it's tail :( The other one is being salted and is being used for a 'soft' mount. I need more stoats ASAP!

My friend brought me a female mallard today too, that she found on the road!

Here she is!


I think she's lovely! So far all I have done is taken her measurements, logged her and put her in the freezer as I haven't yet done a duck. I can't wait to try her! As her breast is a bit damaged from the car, I am thinking a flying pose, which would be a great challenge.

Tomorrow is post day but I am also hoping to get some mice and maybe rats or squirrels done then.